If there’s one word guaranteed to make any motorhomer wince, it’s damp.
Not engine trouble, not a flat motorhome battery – damp. It’s the silent, creeping menace that can turn your pride and joy into a costly headache if left unchecked.
The frustrating thing? It often starts small, invisible even. But give it time, and it can cause serious structural damage, unpleasant smells, lead to a hefty repair bill, and impact the resale value if you’re selling your motorhome down the line. The good news is that with a bit of know-how, you can prevent it, spot it early and deal with it before it gets out of hand.
Let’s lift the lid on damp and keep your motorhome dry, healthy and adventure-ready.
Don’t miss what I had to say about the different types of leisure battery, either, as I explain the pros and cons of the various options on the market.
Why is damp in a motorhome such a big deal?
Regardless of the type and size of motorhome you have, it will still essentially be a rolling home made from a mix of materials – wood, insulation, aluminium, GRP – and all of them react differently to moisture. Once water gets in, it doesn’t just sit politely in one place. It spreads.
Over time, damp can:
- Rot structural timbers
- Delaminate wall panels
- Damage insulation
- Cause mould and mildew
- Affect resale value dramatically.
And unlike with a leaky tap at home, you often won’t notice until the damage is already underway.
Where does damp come from?
Damp in motorhomes usually falls into two categories: ingress and condensation.
Ingress is the big one – it’s the one to worry about most. It refers to water getting in from outside through:
- Failed seals around windows, doors, or rooflights
- Cracked sealant on joints or rails
- Poorly fitted accessories (motorhome bike racks, solar panels or awnings, for example)
- Damage to panels or seams.
Condensation, on the other hand, is caused by everyday motorhome living – cooking, breathing and drying clothes. It’s usually less serious, but can still lead to mould if ventilation is poor. The best motorhome dehumidifier can also help here, too.
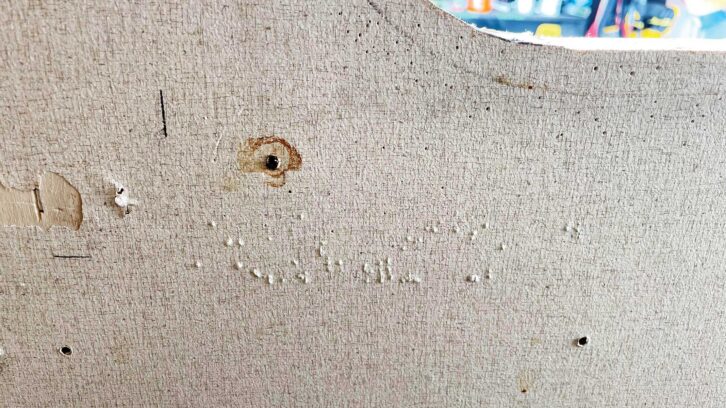
Spotting the early warning signs of damp in a motorhome
Damp rarely announces itself loudly at first. It whispers. So knowing what to look (and smell) for is key. Keep an eye out for:
- A musty or earthy smell
- Soft or ‘spongy’ walls, especially around windows or in corners
- Discolouration or staining on walls and ceilings
- Peeling wallpaper or bubbling surfaces
- Rusty screws or fixings
- Cold patches on walls.
Pay particular attention to these high-risk areas:
- Around windows and rooflights
- Inside overhead lockers
- Around the base of walls and floors
- In the washroom
- Near any external fittings.
If something doesn’t feel right, you should trust your instincts – it usually isn’t.
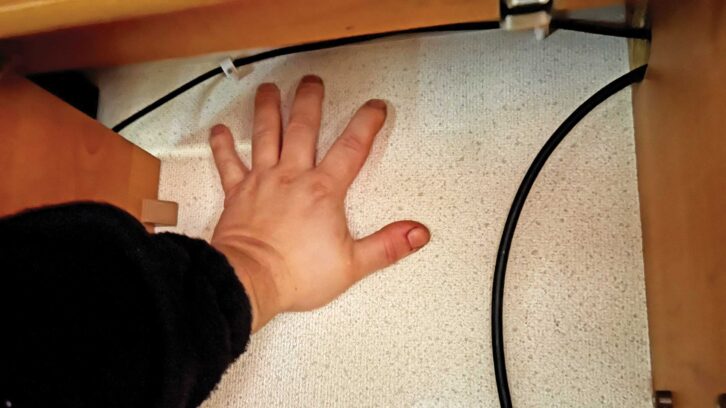
DIY moisture checks
You don’t need to be a professional to keep tabs on damp. A simple routine check can save you thousands.
- The hand test – press gently on walls and panels. Any softness or movement is a red flag.
- The nose test – open cupboards after the ’van has been closed up. A musty smell is often the first clue.
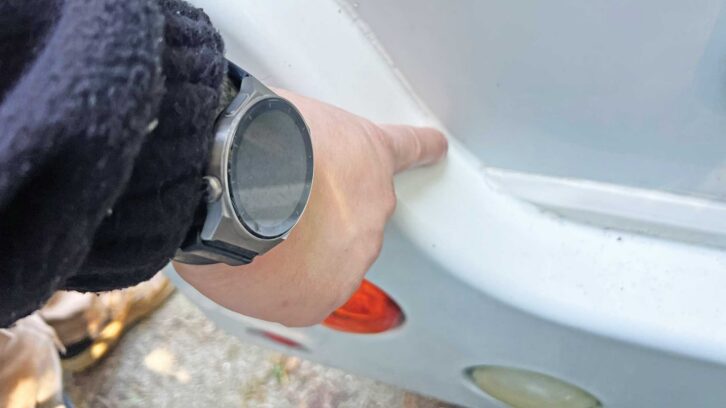
- The visual sweep – take a slow walk around both the inside and outside of your ’van, looking closely at seals and joints.
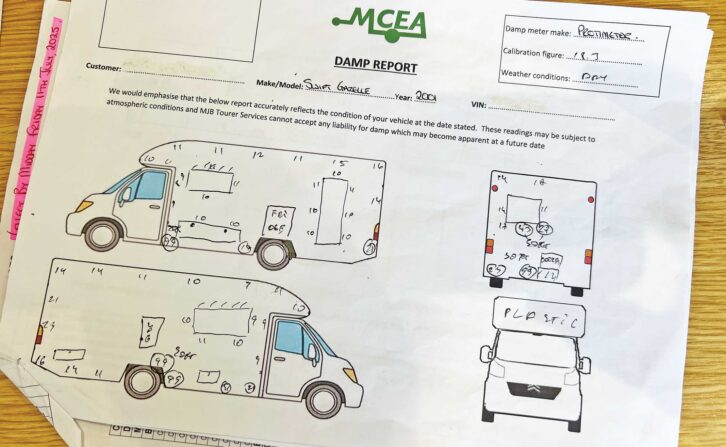
Invest in a moisture meter
For around £20–£50, a handheld moisture meter is a brilliant bit of kit to keep in your motorhome tool kit. It measures the moisture content in your walls and gives you a reading that you can track over time. But, if in doubt, get it professionally checked. A habitation engineer will use a damp meter costing thousands of pounds. As a rough guide:
- 0–15% – Normal
- 15–20% – Keep an eye on it
- 20%+ – Investigate further.
Consistency is key – you should check regularly and note any changes.
Prevention: your best weapon
When it comes to damp, prevention is far easier (and cheaper) than cure.
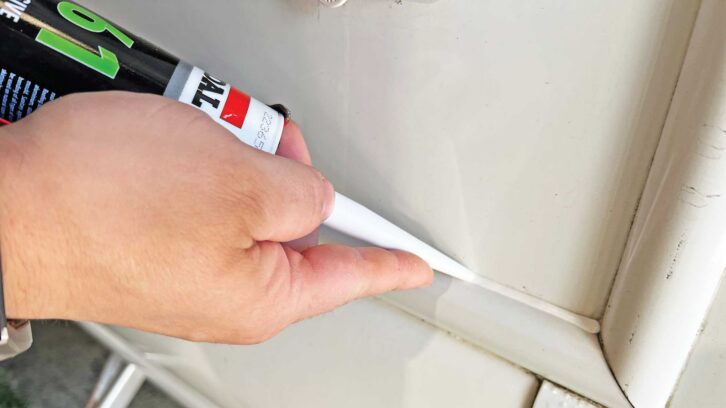
1 Check your seals regularly. Inspect all external seals at least twice a year or every time you’re cleaning a motorhome. Look for cracks, gaps, or lifting of sealant.
2 Keep it ventilated. Even in winter, allow airflow. Use roof vents and crack a window when you’re cooking or sleeping.
3 Don’t ignore small jobs. A tiny crack in sealant today can become a major repair tomorrow.
4 Store it smartly. If your motorhome is in storage, avoid completely sealing it. Moisture needs somewhere to escape.
5 Get an annual motorhome habitation check. A professional damp check once a year is money well spent –especially if your warranty depends on it.
What to do if you find damp
Right, let’s say you’ve found a high reading or spotted a worrying sign. What next?
- Step one: Don’t panic. Not all damp is catastrophic. Early detection is your biggest win.
- Step two: Find the source. There’s no point drying things out if water is still getting in. Check seals, joints and any recent fittings.
- Step three: Dry it out. Improve ventilation, use a dehumidifier, and avoid using the ’van until it’s properly dried.
- Step four: Assess the damage:
Minor issues – resealing and drying may be enough
Moderate issues – partial panel repairs
Severe cases – structural work (this is where costs can climb).
If in doubt, get a professional opinion. Damp can travel, so the visible area isn’t always the full story.
The resale reality
Here’s the hard truth: damp is one of the biggest value-killers of your motorhome. A motorhome with a robust habitation check history and low moisture readings will always command a stronger price. On the flip side, even the hint of unresolved damp can send buyers running – or negotiating hard.
Think of damp prevention as protecting your investment, not just your comfort.
Final thoughts
Damp might be the biggest enemy of your motorhome, but it’s far from unbeatable. A combination of regular checks, good habits and early action makes all the difference. If you remember one thing from this article, let it be this: don’t wait for visible damage. By the time you can see damp, it’s already been at work for a while.
Stay curious, stay vigilant, and your motorhome will reward you with many dry, comfortable adventures.
Don’t miss what I had to say about motorhome gas, either, as I took a look at exchangeable propane and refillable gas systems to help you find the right system for you.
Future Publishing Limited, the publisher of Practical Motorhome, provides the information in this article in good faith and makes no representation as to its completeness or accuracy. Individuals carrying out the instructions do so at their own risk and must exercise their independent judgement in determining the appropriateness of the advice to their circumstances. Individuals should take appropriate safety precautions and be aware of the risk of electrocution when dealing with electrical products. To the fullest extent permitted by law, neither Future nor its employees or agents shall have any liability in connection with the use of this information. Double check any warranty is not affected before proceeding.
If you’ve enjoyed reading this article, why not get the latest news, reviews and features delivered direct to your door or inbox every month. Take advantage of our brilliant Practical Motorhome magazine SUBSCRIBERS’ OFFER and SIGN UP TO OUR NEWSLETTER for regular weekly updates on all things motorhome related.
Leave a Reply