One of the most common questions that we get asked when doing Q&A sessions at motorhome shows has to be about motorhome electrics and it always feels a little like Groundhog Day whenever these issues pop up.
Electrics often fill people with fear, and thoughts of vast auto electrician bills and hours spent hunting out obscure electrical components in a maze of wiring. In reality, though, many electrical problems are easily solvable with no special training and can often be as simple as replacing a fuse or cleaning an electrical terminal. Many can be traced back to low voltage, and there are a number of simple checks that you can do yourself without having to pay for a specialist, so you can instead focus on enjoying your tours in the best motorhome.
Even if you hate the thought of DIY and prefer the local garage to check things over, being armed with some basic electrical tips might help avoid you getting stranded. If you’re thinking that a call out to a recovery firm is a quick thing, in reality it depends where you are and the volume of calls the recovery firm is handling.
An example of this came about when I was in Europe in a campervan. I waited more than five hours, when stranded in France on a Saturday, and even when help arrived there were no mechanics around until Monday, wasting two days of holiday time. If ever there was a reminder of the importance of European breakdown cover for a motorhome, it was this.
But armed with a little basic knowledge many electrical issues can be solved. So let’s get started!
You can also take a look at what Motorhome Matt has to say about how to get the best out of your motorhome electrics, too.
The basics about motorhome electrics
Most motorhomes have two batteries – one that starts the engine and powers the base vehicle systems and a second, entirely separate battery that powers all the habitation equipment. Both batteries run on 12V DC and the habitation battery is recharged by plugging into a mains hook-up or via a solar panel if one is fitted.
The vehicle battery is usually only recharged by the vehicle’s alternator. Not all motorhomes recharge the vehicle battery when it’s plugged into a mains hook-up – it’s well worth adding a separate charging circuit if this is the case with your motorhome (these are easy to fit and not expensive), and we’ll show you how to check this later.

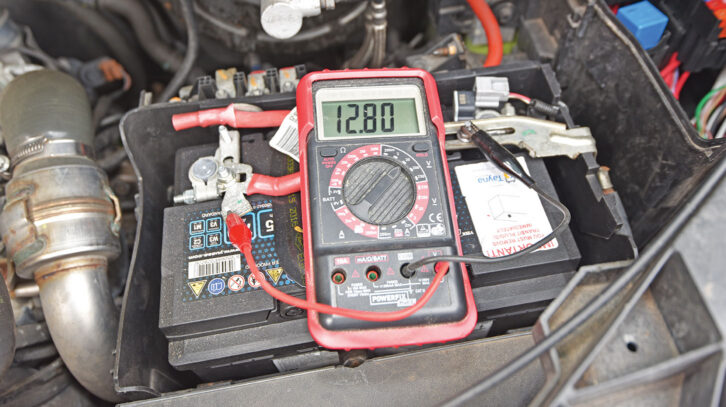
For your ’van’s base vehicle and habitation devices to operate correctly, the 12V batteries must have a healthy voltage (12.7V is fully charged and just 12V is flat). So all electrical checks have to start with the batteries.
Don’t miss what I have to say about avoiding a flat motorhome battery, either.
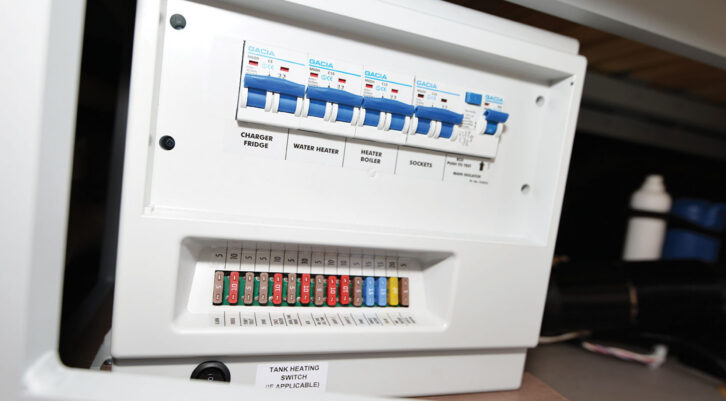
Fuses and relays
Grab your owner’s manual and check out the location of the fuses for both the vehicle and the habitation sections of your motorhome. Modern vehicles may have multiple base vehicle fusebox locations, and A-class motorhomes and RV models may have them moved to a slightly different location – but they won’t be too far away from their original location, as they’re constrained by the length of the original wiring loom.
Fuses are small devices with a small strip of metal that melts when the current exceeds a certain limit (5A, 10A, 100A). They have one job to do: they protect wiring looms and components from the risk of fire and failures. Without a fuse, the wiring loom itself becomes the fuse and can start to glow red hot, igniting anything around it (like all those soft furnishings). Every single device – especially anything you’ve added as an extra – has to be protected by a fuse of a suitable rating. They are not optional – they are a must-have.
Relays are simply switches that either remotely trigger an electrical circuit or allow a high-current circuit to be activated by a low current signal. They save having to have thick cables behind the dashboard and big heavy-duty switches. Together with CAN-bus wiring (which uses digital signals to trigger devices), they help reduce wiring volume and weight.
Fuses can be hard to check by eye – sometimes the metal circuit may have a barely visible hairline crack – so it’s highly recommended to test them with a multimeter. More on which later.
I would strongly recommend not using cheap fuses sourced from bargain-basement shops or anything that has been directly shipped from a non-EU country.
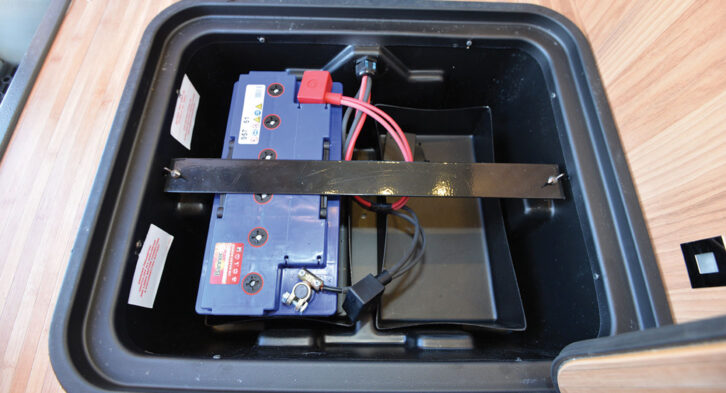
Find and check the battery
As mentioned, most motorhomes have at least two batteries – one powering up the base vehicle and one powering up the habitation equipment. Again, grab the owner’s manual and familiarise yourself with their location. You don’t want to be playing ‘hunt the battery’ in the middle of the night in winter, if you’re motorhoming in winter!
Once you’ve located the battery, you need to check it with a multimeter – do not solely rely on the built-in control panel, as low voltage or battery issues can make it inaccurate. Some self-build models using cheap voltage meters can also be inaccurate – I tested one that was always one volt out. As a fully charged battery should read around 12.7V and a flat battery is 12V, misreading by one volt is a major issue.
All multimeters allow you to read the voltage of the battery easily, but the voltage is only part of the story of battery health. In some cases a battery will hold charge perfectly and seem to give the correct voltage but be unable to start the vehicle or sustain any load.
For a more accurate picture of a battery’s health you’ll need to do a load test. This requires a specialist bit of kit that most garages and motorhome dealers have that will load up the battery and check how well it can sustain the high currents needed by the vehicle starter motor when it’s cranking the engine. This test is related to the cold cranking amps (CCA) figure that is printed on the battery label. The higher the CCA number on a new battery, the longer it can crank an engine for.
You can buy load testers for home use, and prices start from around £50, but it’s not essential as many garages will test batteries for you for free.
Why motorhome batteries fail in winter
The explanation for this is simple: a low temperature reduces the available capacity of all battery types. At zero degrees, a battery will lose around 20% of its capacity. Some lithium batteries will not even work below zero degrees – their battery management system cuts out to protect them – so temperature is very important. This is why lithium batteries always need to be fitted inside the motorhome, not in a cold outside locker.
Most people don’t realise that the capacity of a motorhome battery on the label (eg 100Ah) only relates to its capacity at a certain temperature. This figure is usually tested at 20ºC. So your 100Ah battery will become an 80Ah battery at 0ºC, giving you far less cranking time. Just like specifying a solar panel, with batteries, bigger is always better to account for this loss in performance.
In the UK, which is classed as a cold climate, when the temperature is below 10ºC you rarely have all of the battery capacity stated on the label.
The other issue in winter when starting a diesel is the cold start system of the vehicle. Typically, this involves glow plugs that heat up the air inside either the inlet tract or the cylinder to make the diesel fuel more likely to ignite – remember, diesel ignites by the heat of compression, not by a spark like a petrol engine.
Whatever form of pre-heating the engine the vehicle uses, the power has to come from somewhere and usually pressing the remote key fob will trigger the engine’s start procedure (and use power).
On older motorhomes you have to wait for the glow plug light to switch off before cranking the engine, but not on most modern vehicles.
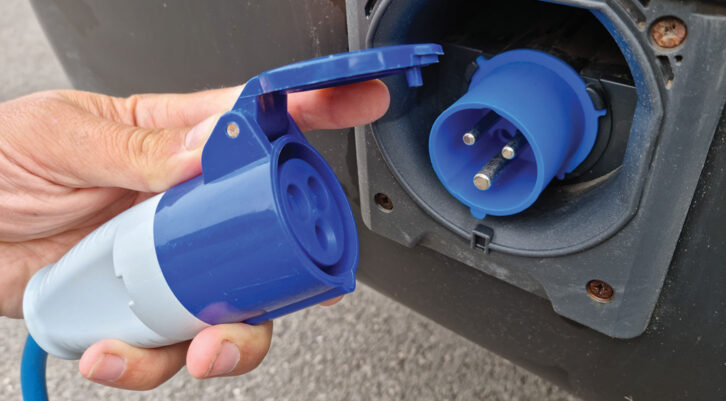
Because of the extra electronics on modern vehicles it’s very important to plug your motorhome into the mains over winter. Most motorhomes do not charge the vehicle battery from the mains hook-up (though better quality charging systems do), so this is an important point to note.
We highly recommend adding a charging circuit to your motorhome’s vehicle battery if it doesn’t have one.
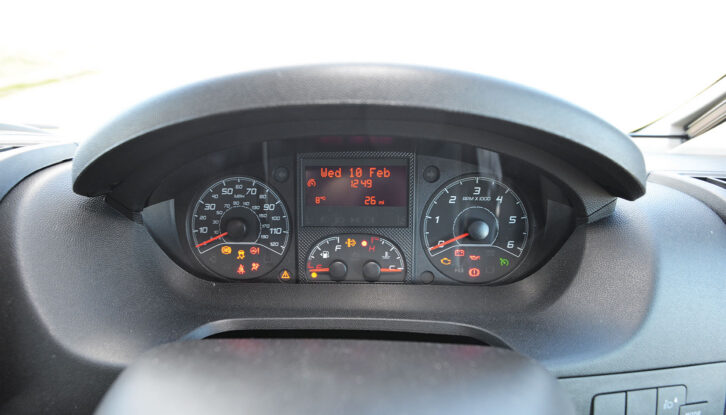
Dashboard warning lights
The key thing to note is that dashboard warning lights can fib. They are not always correct and can trigger in error if the voltage is low or isn’t receiving a stable signal.
The tell-tale signs that a warning light may be erroneous is if multiple ones appear at the same time (it’s very rare for several electrical components to all fail at the same time) or different ones keep popping up.
If the voltage has been checked and is stable, clear any fault codes and then see which ones reappear – if any. If any error codes do occur after the voltage check, these need to be investigated.
Don’t miss what Diamond Dave has to say about the dashboard warning lights motorhome myth, either.
Buy a multimeter!
A multimeter really is an essential for any motorhome tool kit.
Without a multimeter, checking electrical systems is pure guesswork and can lead to expensive mistakes if you start replacing components at random, based solely on dashboard light information or error codes.
Error codes can also be misleading if the ECU has been subject to low or erratic voltage. On the habitation battery, a low battery can cause the control panel to misread and random components to misbehave. With simultaneous multiple faults, always suspect the voltage as a first step to help you avoid what cna be a common motorhome mistake.
Step one has to be a separate check of battery voltage before any ECU data can be relied upon. All electrical checks must start with a hand-held multimeter and these can be picked up inexpensively (for less than £20). I would only order online from a UK supplier.
Battery and alternator
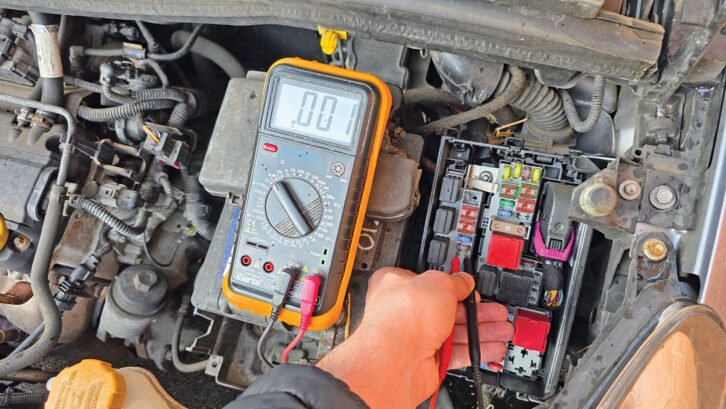
The most basic form of checks are to set the multimeter to read DC voltage, symbolised by V next to a horizontal flat line above a dotted line. A wavy line is for AC voltage – don’t use that one.
With the probes inserted black into ‘common’ and red into V on the meter, turn the dial to Select on the 20V scale. Touch the terminals on the battery with the end of these probes (red is positive) and you will see a voltage reading on the display. If it’s a minus reading, you’re either touching the wrong terminals on the battery or you have the probes transposed (it won’t damage them). The rotary scale (or buttons) on the meter can be altered to change the scale, so if the voltage shown is 0.0012, just change the settings to the correct range. It won’t damage the meter if the scale is wrong.
A fully charged battery will read 12.7V. A flat battery is around 12V, while around 12.3-12.5V indicates that the battery needs recharging.
With the multimeter still set to DC voltage, start the vehicle and switch the headlights on (this will force a smart alternator into a charging cycle – the alternator isn’t always on with many modern ’vans). Now re-measure the battery voltage in exactly the same way. You want to see a change in the voltage to around 13.5V if the alternator is on and charging the battery.
Always check battery voltage and alternator voltage before a long trip. A battery will power the vehicle for a few hours without an alternator supplying charge, but no more than that.
You can also test if the vehicle battery is on a charging circuit. Switch the engine off and check the battery voltage. Now plug the motorhome’s mains hook-up cable into a powered socket. Re-measure the voltage at the vehicle battery. If it doesn’t increase in voltage your motorhome doesn’t recharge the vehicle battery from a hook-up, and it would be wise to have a device such as a Van Bitz Battery Master or a Sterling Battery Maintainer.
Check fuses with a meter
Most blade fuses in a fusebox will have two exposed metal terminals facing outwards – mini fuses are the most commonly used these days. These tabs are designed for you to touch multimeter probes to the end of the fuses and check that they’re intact (often referred to as continuity) without having to remove each fuse from the fusebox.
You can still remove a fuse manually (and inspect it visually) with the plastic pincer-style tool that is often found in the lid of the fusebox, but it’s quicker to use a multimeter.
With the meter set to Ohms (Ω) touch both pins on the fuse with the probes – it doesn’t matter which way around you touch the probes on the tabs, and you can adjust the scale on the Ohm section of the meter to get a value. So long as the meter reacts and shows some value on the screen, the fuse is intact.
It should show only a miniscule resistance (around 0.1 Ohm or less) but if the meter displays a 1 (meaning infinite resistance) the fuse has blown. Some multimeters have an audible continuity indicator that will bleep if the circuit is unbroken.
Checking relays
Relays come in many different shapes and sizes, so refer to your owner’s manual to find their location and which circuits they operate (the fusebox lid also often details them). They’re usually only found in the base vehicle wiring, not the habitation section.
Headlight circuits, fuel pumps, heated rear windows and all manner of high-current circuits are usually activated by a relay. If one of them fails the relay will stop making a slight clicking noise when it activates. Once you’ve found the relay you’re checking, the first thing to do is to put your finger on it while an assistant activates the headlights or whatever item you’re checking. If you can’t feel (or hear) a slight click, the relay is duff.

The quickest way to check this is to swap the relay with an identical current rated one nearby – they tend to be grouped together and simply pull out with a firm grip. If the circuit now works, the original relay is duff – mark it with an X so it doesn’t get mixed up with any other ones, and buy a replacement.
In an emergency, relays can be bridged out with a stout bit of wire and two male spade terminals (or even a paperclip), but this is a highly risky practice as it means the relay is permanently on – as such, we wouldn’t recommend it.
Checking current drain
Another measurement to check with a multimeter is the static current drain on your vehicle battery when the engine is switched off. This is also called parasitic drain or quiescent drain.
Some motorhome security gadgets, such as aftermarket alarms, immobilisers and trackers that have been fitted will increase this total parasitic drain value.
Typically, a healthy modern vehicle battery should last about three weeks if the vehicle hasn’t been driven, but if the battery goes flat after a few days, the parasitic drain needs to be checked.
To do this, the first thing to source is your vehicle’s radio code as you’ll be removing the vehicle battery’s earth strap and removing all power to the vehicle’s systems. Have your alarm key fob handy, too, as the alarm might activate and need silencing. Also, open the driver’s side window fully down so you don’t get locked out!
Make sure all the interior lights to the vehicle are switched off and then remove the negative (black or braided metal) earth terminal from the battery. These are usually on a 10mm or 13mm fixing. Tuck the earth strap out of the way so it can’t touch the earth terminal of the battery.
With the probes of the meter plugged into measuring current (A or mA) and ‘common’ (black), touch one probe on the battery terminal and one probe on the end of the earth strap to measure the current. A figure of up to 100mA is acceptable on a modern vehicle (on an older classic you’d expect 50mA), but anything significantly higher than
this indicates a circuit that is faulty and drawing too much current.
So if you have a reading of say 1A (way too high), how do you find out the issue? With the earth strap in place, you have to start removing fuses, one by one, until the current drain drops around 100mA.
Checking earth straps
The other common source of issues is earth straps. There are typically two or three on a motorhome. One connects the vehicle battery to the metal chassis of the vehicle. The whole of the steel bodywork of a motorhome base vehicle carries a negative (or earth) charge to save wiring.
It’s always worth checking the earth strap to the battery and removing and cleaning the earth strap terminals (with a bit of sandpaper or a wire brush) to ensure that the strap has a good electrical connection. All bolts and terminals must be tight – if they’re loose you can get erratic voltage issues.
The other earth straps may not be as easily visible because they will connect the engine and gearbox to the chassis. As the engine and gearbox are mounted on rubber mounts they do not have a direct connection to the metal of the chassis. Everything electrical bolted to the engine (air conditioning pump, fuel injectors, starter motor, alternator) relies on these earth straps to provide the negative supply from the battery.
Because these earth straps are in the engine bay they lead a hard life and often degrade over time. Just as with the battery earth strap they must have clean connections and be in good condition.
The verdict on motorhome electrics checks and fixes
Hopefully this guide has demystified motorhome electrics and made it a little less scary. Many electrical issues can be traced back to low voltage or a simple blown fuse, and can easily and quickly be fixed by owners without wasting time and money at a garage or waiting for recovery. Just make sure you add a multimeter to your touring kit!
Don’t miss my tips on motorhome fuel consumption, either, as I explain what you can do to improve your economy.
Future Publishing Limited, the publisher of Practical Motorhome, provides the information in this article in good faith and makes no representation as to its completeness or accuracy. Individuals carrying out the instructions do so at their own risk and must exercise their independent judgement in determining the appropriateness of the advice to their circumstances. Individuals should take appropriate safety precautions and be aware of the risk of electrocution when dealing with electrical products. To the fullest extent permitted by law, neither Future nor its employees or agents shall have any liability in connection with the use of this information. Double check any warranty is not affected before proceeding.
Leave a Reply